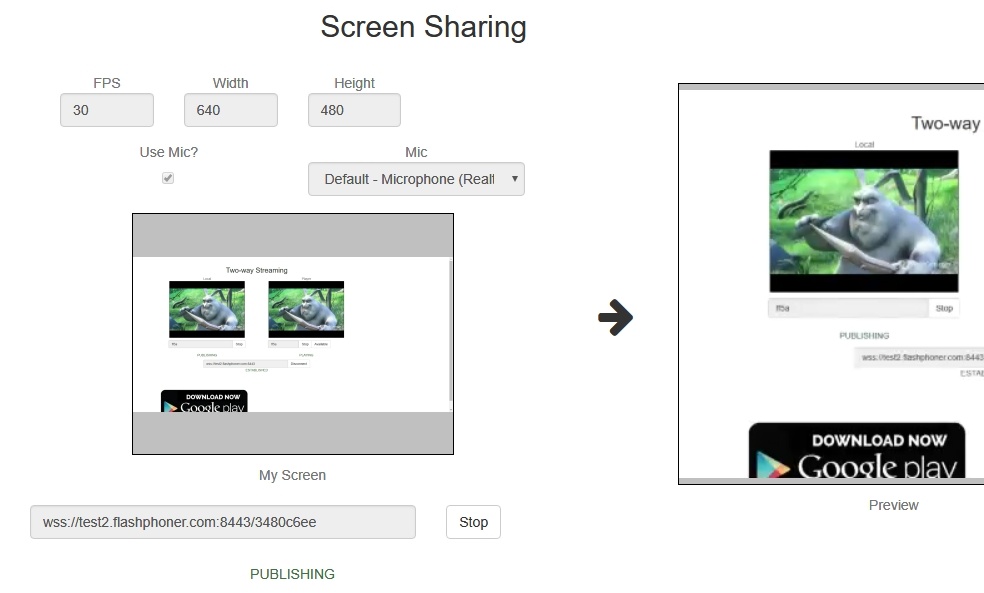
Screen sharing example
Screen sharing is available for Chrome and Firefox, and requires build-up and installation of the corresponding extensions from Chrome Store and Mozilla Add-ons.
Source code for the extensions is available by the following links:
Chrome Screen Sharing Extension
Firefox Screen Sharing Extension
Extension for Google Chrome with publication in Chrome Store
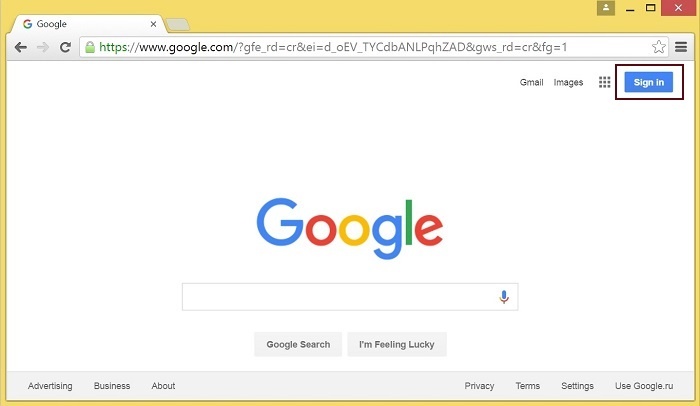
Create a Google account
1. Go to google.com and click ‘Sign in’ button
2. On the ‘Sign in’ page, click ‘Create account’ link
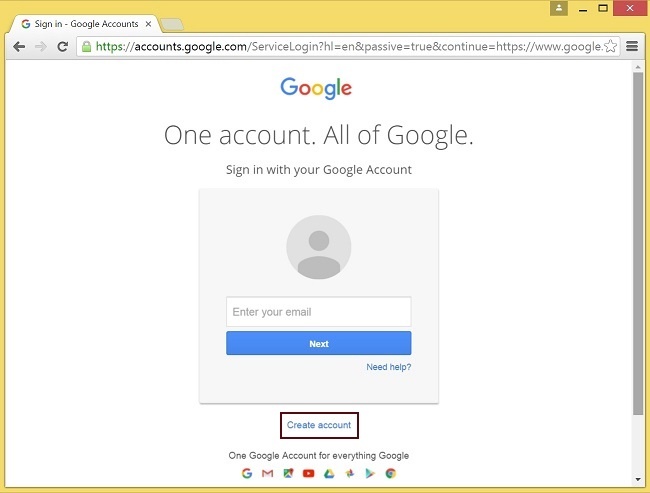
3. ‘Create your Google Account’ page will be opened
Fill the required fields and click ‘Next step’ button to create the account.
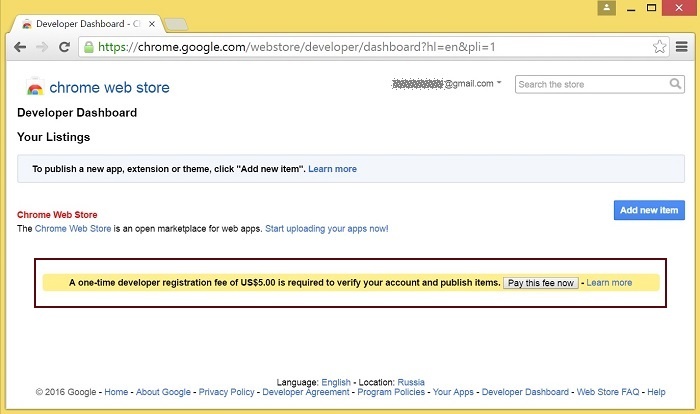
Register as Chrome Web Store Developer
1. Sign in to Chrome Developer Dashboard with the created Google account
2. Pay a one-time $5 developer signup fee
Customization for your domain
Follow the procedures described below to use the extensions with your domain.
Edit manifest file manifest.json of the Chrome extension.
Change:
- name
- author
- description
- homepage_url
- under "externally_connectable":"matches" change flashphoner.com to your domain
Save your icons for the extension to chrome-extension directory and edit the file names in "icons" and "web_accessible_resources". (For more information, see Manifest - Icons and Supplying Images.)
Package the extension
Package files from chrome-extension folder into ZIP archive.
Publish the extension
1. Sign in to Chrome Developer Dashboard
2. In the dashboard, click ‘Add new item’ button
3. Accept the developer agreement
4. On the ‘Upload’ page, choose the chrome-extension.zip file and click ‘Upload’ button
5. When the extension is uploaded, the page for editing the extension draft will be opened
Edit the extension as required and click ‘Save draft and return to dashboard’ button at the bottom of the page.
6. The extension will appear in the developer dashboard
Click ‘Publish’ link to publish the extension.
A published extension will have status ‘Published’ as on the image below.
For more information, see Chrome Web Store Publishing Tutorial.
Extension Inline Installation
Extension installation can be initiated by clicking a link on the Screen Sharing client page.
Note that the extension to be installed should be customized, published and approved before inline installation can be used.
Follow the procedures described below to use the client with your extensions.
1. When publishing, select ‘Inline Install’ option
2. Verify and add website with your domain to the extension
- Click ‘Add a New Site’
- Google Search Console page will open in a new tab
Enter URL with your domain.
- A page with the instruction for the site verification will open
Follow the procedure steps and click ‘Verify’ button.
- If the verification is passed, a page confirming successful verification will be opened
- The website will appear in the list in the extension options and the extension can be associated with the site
Extension for Firefox with publication in Mozilla Add-ons
Go to accounts.firefox.com and create a Firefox account for your email address (e.g. a Gmail address).
Sign in to Mozilla Add-ons
1. Go to Mozilla Add-ons and click ‘Log in’ link
2. Enter the email address used to create the Firefox account and click ‘Continue’ button
3. ‘Sign in’ page will be opened
Enter the Firefox account password and sign in.
Customization for your domain
Edit the extension manifest file package.json and index.js of the Firefox add-on.
In package.json change:
title
name
id
description
author
homepage
In index.js replace flashphoner.com with your domain.
Packaging and publication in Mozilla Add-ons
To package Firefox add-on, you will need to install additional tools
- NPM
- JPM
Install prerequisites
The steps below describe how to install the prerequisites on Windows.
(For more information, see the guide from Mozilla.)
1. Install Node.js
- Download the installer from nodejs.org
- Run the downloaded installer
- Follow thru the installation wizard: accept the license agreement and the default installation settings
- Restart the computer
2. Make sure that NPM is installed: run command npm -v in command line
3. Install JPM: run npm install jpm –global or npm install jpm command in command line
4. Make sure that JPM is installed: run command jpm in command line
Package the add-on
1. Open command line and navigate to firefox-extension directory
2. Execute jpm xpi command to create XPI file
Submit the add-on at Mozilla portal
1. Sign in to Mozilla Add-ons
2. Go to ‘Tools’ | ‘Submit a New Add-on’
3. Select the created XPI
4. When the file is uploaded, click ‘Continue’ to follow the submission steps
After the submission, the add-on will appear in the submissions list (‘Tools’ | ‘Manage My Submissions’).
See more on publishing add-on to Mozilla here.
Code of the example for Chrome and Firefox
This example uses Flashphoner extensions for work with domain *.flashphoner.com. For work with your domain, build up and publish your extensions as described above.
As temporary solution, IP address of your WCS server can be added to file C:\Windows\System32\drivers\etc\hosts (on Windows OS) as test.flashphoner.com. That way, you will be able to test your WCS server with domain test.flashphoner.com till the extensions for your domain are built up.
With Chrome, the example works only by https://.
The path to the source code of the example on WCS server is:
/usr/local/FlashphonerWebCallServer/client/examples/demo/streaming/screen-sharing
screen-sharing.css - file with styles
screen-sharing.html - page of the screen sharing streamer
screen-sharing.js - script providing functionality for the streamer
This example can be tested using the following address:
https://host:8888/client/examples/demo/streaming/screen-sharing/screen-sharing.html
Here host is the address of the WCS server.
For Firefox, this example requires as a dependency file flashphoner_screen_sharing-0.0.4-fx+an.xpi, which is located in the following directory:
/usr/local/FlashphonerWebCallServer/client2/examples/demo/dependencies/screen-sharing/firefox-extension
For Chrome, link to the extension is specified directly in file screen-sharing.html line 17
Customization of the example script for Chrome
Edit screen-sharing.html line 17 and screen-sharing.js line 6
- in screen-sharing.html, chrome-webstore-item should point to your extension in Chrome Web Store
- in screen-sharing.js, change value of chromeScreenSharingExtensionId variable to your extension ID
To get extension ID, click ‘More info’ for the extension in Chrome Developer Dashboard.
Customization of the example script for Firefox
Edit params object in installExtension()method in screen-sharing.js. line 179
Change
- "Flashphoner Screen Sharing" to the name of the add-on (will be used in the install confirmation dialog)
- flashphoner_screen_sharing-0.0.4-fx+an.xpi to the name of the add-on XPI
- Hash value to hash generated for the XPI file
(See params object description here. You can easily get sha1 sum on Linux by using sha1sum <XPI file> command.)
Work with code of the screen sharing example
To analyze the code, let's take the version of file screen-sharing.js with hash cf0daabc6b86e21d5a2f9e4605366c8b7f0d27eb, which is available here and can be downloaded with corresponding build 0.3.18.1894.
1. Initialization of the API. line 11
API is initialized after loading the page. Chrome extension ID is passed to the init() method.
2. Path to the Firefox add-on. line 178
3. Connection to WCS server. line 91
4. Video constraints. line 106
Type 'screen' is specified in the constraint for video stream.
5. Video streaming. line 114
After establishing connection to the server, new video stream is created with method session.createStream(), and function publish() is called to publish the stream.
6. Playback of preview video stream. line 131
When the screen sharing stream is published, preview video stream is created with method session.createStream(), and function play() is called to start playback of the stream in <div> element remoteVideo.
As the result, screen sharing video is sent to the server and played from the server in different <div> element.
To play the same video on different page, use the example Player.