Let’s Encrypt is a certification center that automatically issues free cryptographic certificates. You can receive and import such a certificate to your WCS server as described below:
Reveiving SSL certificate using certbot
Installing Certbot
Centos
1. Install epel-release repository
on Centos 7
yum install epel-release
on Centos 8
sudo dnf install https://dl.fedoraproject.org/pub/epel/epel-release-latest-8.noarch.rpm
2. Install certbot
on Centos 7
yum install certbot python2-certbot
on Centos 8
sudo dnf install certbot python3-certbot
Ubuntu
Install certbot by the following command
sudo apt-get install certbot
Other OS
Install certbot by official manual
Receiving SSL certificate
1. Run certbot
If there is a web server on the same server with WCS, run
sudo certbot certonly --apache
or
sudo certbot certonly --nginx
If WCS only is installed to the server, run
sudo certbot certonly --standalone
This will request all the necessary information and download SSL certificate files
If you received the certificate successfully, proceed to the next step. If any errors occurred, refer to the certbot documentation.
2. Make sure the /etc/letsencrypt/live/yourdomain/ folder on your server has the following files:
cert.pem
chain.pem
fullchain.pem
privkey.pem
Copy these files to your computer.
Importing SSL certificate to WCS storage
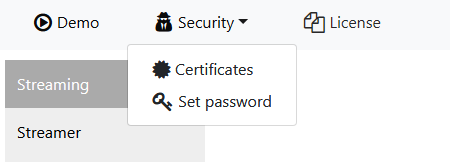
1. Open the web interface of WCS. Select "Security" in the upper menu, then "Certificates":
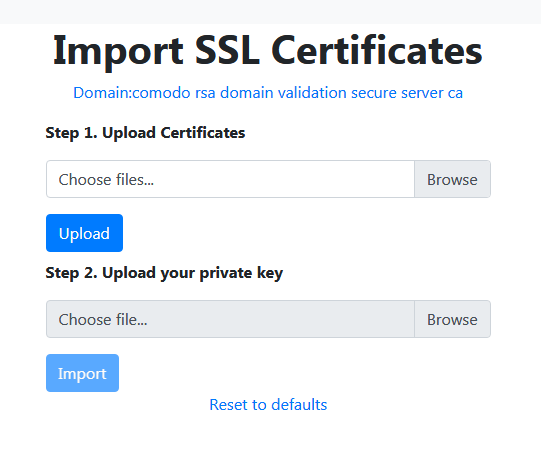
2. On the import page upload the certificate file fullchain.pem and the key file privkey.pem:
Restart the WCS server to apply new settings. After restarting the server, open https://yourdomain:8443. If the certificate was imported correctly, you should see that the browser accept the certificate of the WCS server.
If importing of the certificate failed with some errors, proceed to the keytool importing.
3. Remove the self-signed certificate from the keystore
keytool -delete -alias selfsigned -keystore /usr/local/FlashphonerWebCallServer/conf/wss.jks
4. Create a new keystore based on the certificate and the private key
openssl pkcs12 -export -in /etc/letsencrypt/live/yourdomain/fullchain.pem -inkey /etc/letsencrypt/live/yourdomain/privkey.pem -out /etc/letsencrypt/live/yourdomain/pkcs.p12 -name yourdomain
At this stage you need to enter the password from your private key test.flashphoner.com.key as well as set a password for the keystore itself. Here we set 'password'.
Enter pass phrase for yourdomain.key: ******
Enter Export Password: password
5. Import the newly created keystore to the existing wss.jks
keytool -importkeystore -srckeystore /etc/letsencrypt/live/yourdomain/pkcs.p12 -srcstoretype PKCS12 -destkeystore /usr/local/FlashphonerWebCallServer/conf/wss.jks
At this stage you have to enter passwords from the imported keystore and the wss.jsk keystore.
Enter destination keystore password: password
Enter source keystore password: password
Entry for alias yourdomain successfully imported.
Import command completed:  1 entries successfully imported, 0 entries failed or cancelled
Restart the WCS server to apply the new settings. After restarting the server, open https://yourdomain:8443 again. If certificates are imported correctly, you should see that the browser accepts the WCS server certificate.