| Include Pagetoc |
|---|
A SIP call between two browsers made via WCS is a special case of calls between a browser and a SIP device when the web application in a browser serves as a softphone for both parts of the call.
Overview
Supported platforms and browsers
Chrome | Firefox | Safari 11 | Edge | |
|---|---|---|---|---|
Windows | + | + | + | |
Mac OS | + | + | + | |
Android | + | + | ||
iOS | - | - | + |
Supported protocols
- WebRTC
- RTP
- SIP
Supported codecs
- H.264
- VP8
- G.711
- Speex
- G.729
- Opus
Supported SIP functions
- DTMF
- Holding a call
- Transferring a call
Management of SIP functions is performed using the REST API.
Operation flowchart
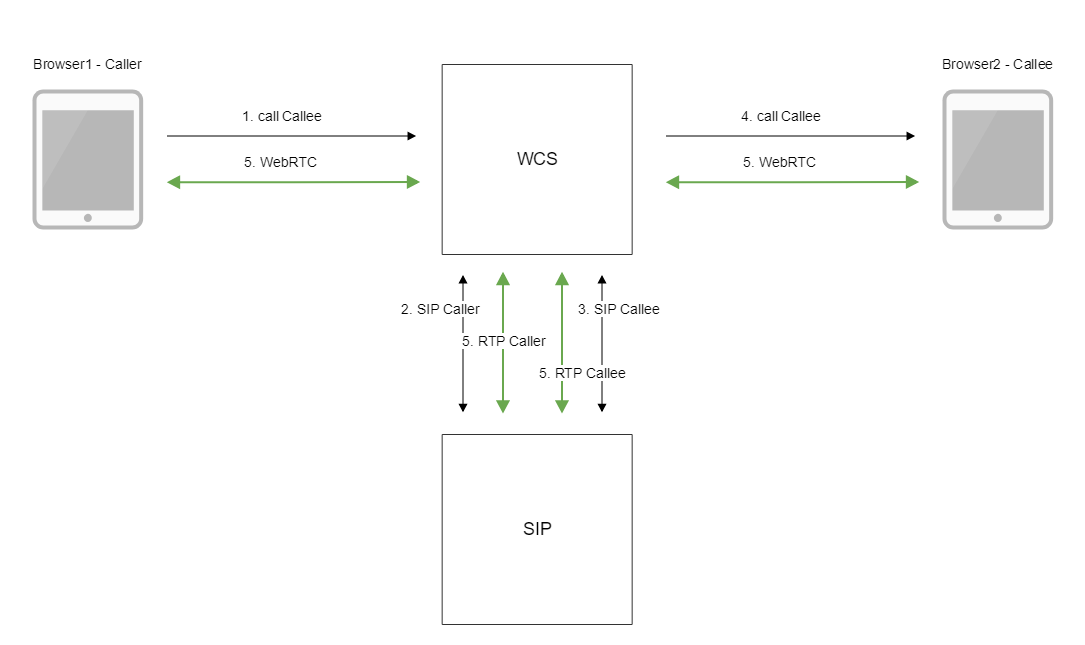
SIP server as a proxy server to transfer calls and RTP media
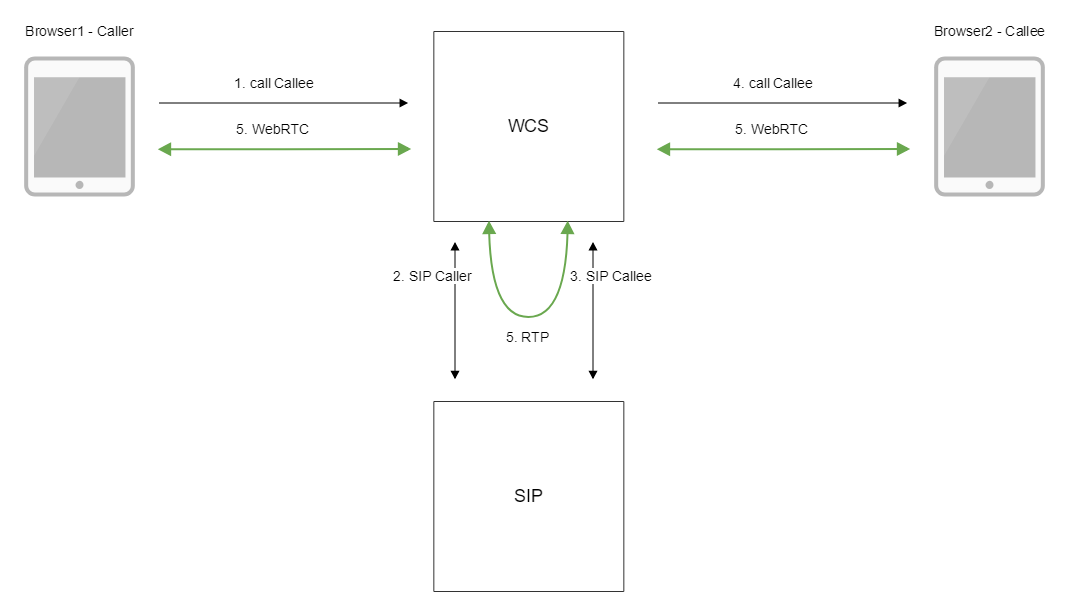
SIP server as a server to transfer calls only
- The browser 1 begins a call from the Caller account to the Callee account
- WCS connects to the SIP server
- The SIP server
...
- transfers the call to the Callee to WCS
- WCS sends to the browser 2 an event that a call is received
- Browsers exchange audio and video streams
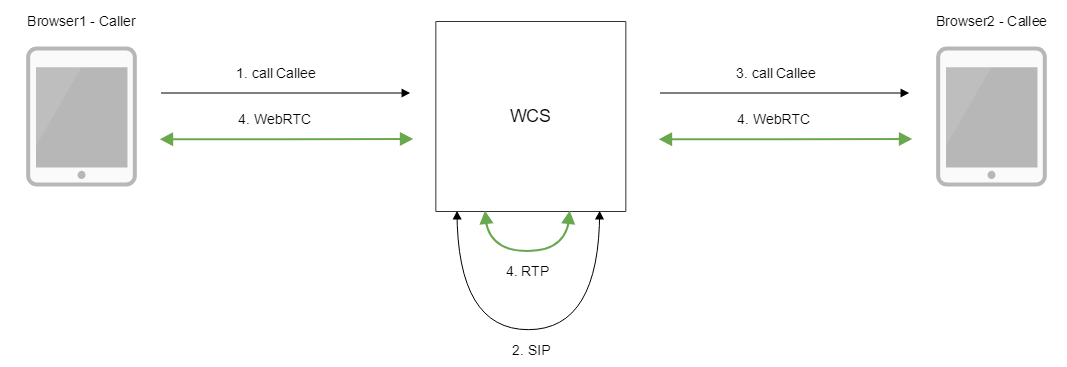
Without an external SIP server. SIP and RTP media are processed by WCS
- The browser 1 begins a call from the Caller account to the Callee account
- WCS establishes a SIP connection between accounts
- WCS sends to the browser 2 an event that a call is received
- Browsers exchange audio and video streams
Quick manual on testing
1. For the test we use:
- two SIP accounts;
- the Phone web application to make a call
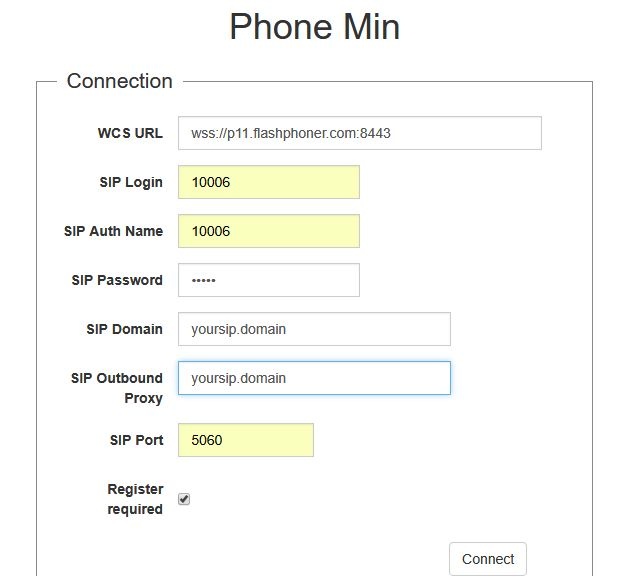
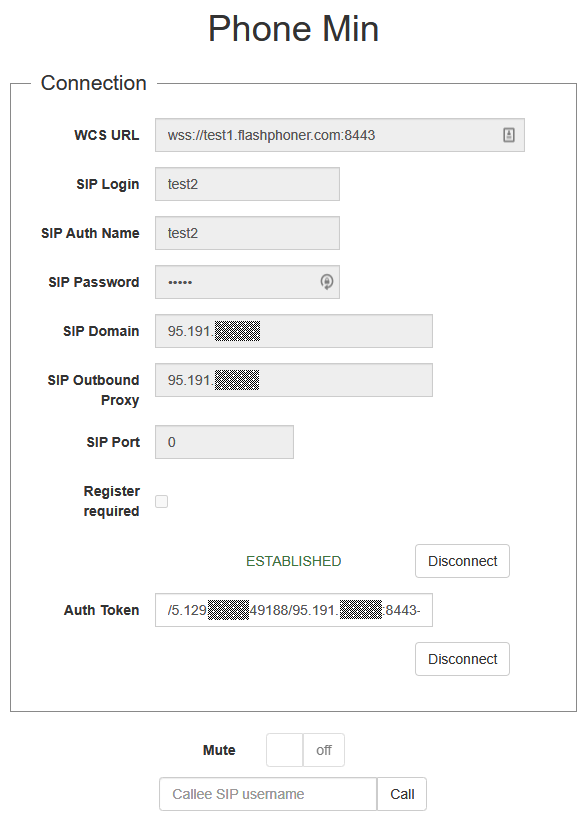
2. Open the Phone web application. Enter the data of the SIP account and click the Connect button to establish a connection with the server:
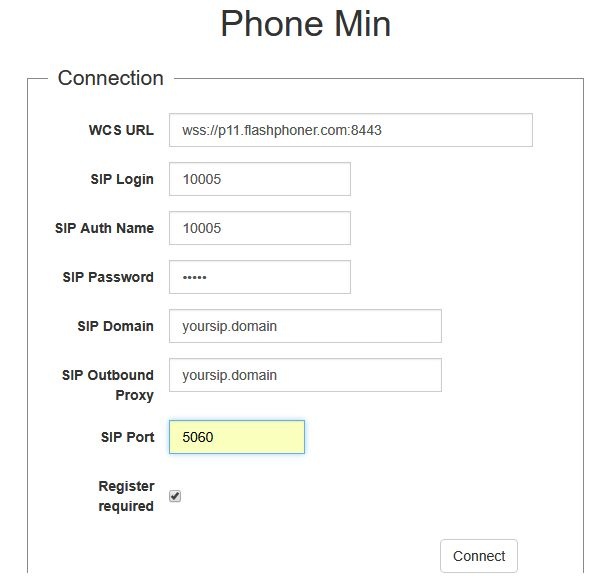
3. Open the Phone web application in a new browser tab. Enter the data of the second SIP account and click the Connect button:
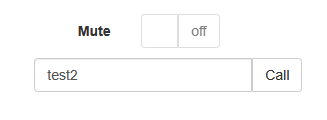
4. Enter the identifier of the SIP account receiving the call and click the Call button:

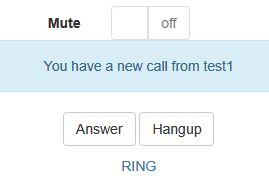
5. Answer the call by clicking the Answer button:

The call starts:

6. To terminate the call, click the "Hangup" button.
Call flow
Below is the call flow when using the Phone example to create a call. The SIP server is used as a proxy server to transfer commands and media.
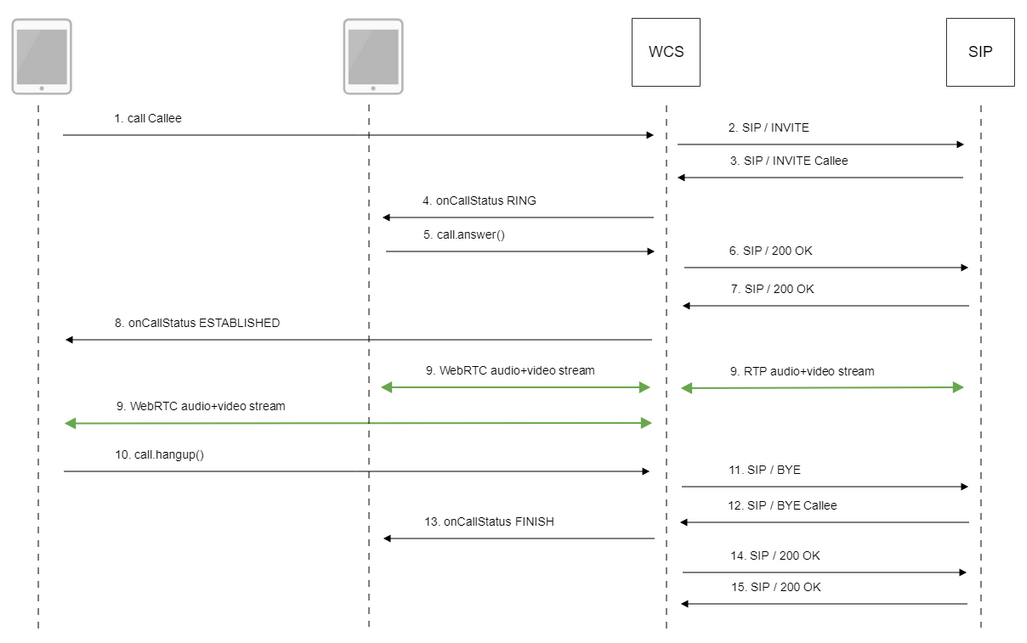
1. Sending the /call/startup REST query using JavaScript API:
session.createCall(), call.call() code
| Code Block | ||||
|---|---|---|---|---|
| ||||
    var outCall = session.createCall({
		callee: $("#callee").val(),
        visibleName: $("#sipLogin").val(),
		localVideoDisplay: localDisplay,
		remoteVideoDisplay: remoteDisplay,
		constraints: constraints,
		receiveAudio: true,
        receiveVideo: false
        ...
    });

outCall.call(); |
2. Establishing a connection to the SIP server
3. The SIP server establishes a connection to WCS
4. Sending to the second browser an event notifying about the incoming call
CallStatusEvent RING code
| Code Block | ||||
|---|---|---|---|---|
| ||||
    Flashphoner.createSession(connectionOptions).on(SESSION_STATUS.ESTABLISHED, function(session, connection){
        ...
    }).on(SESSION_STATUS.INCOMING_CALL, function(call){
        call.on(CALL_STATUS.RING, function(){
		    setStatus("#callStatus", CALL_STATUS.RING);
            ...
}); |
5. The second browser answers the call
call.answer() code
| Code Block | ||||
|---|---|---|---|---|
| ||||
function onIncomingCall(inCall) {
	currentCall = inCall;

	showIncoming(inCall.caller());

    $("#answerBtn").off('click').click(function(){
		$(this).prop('disabled', true);
        var constraints = {
            audio: true,
            video: false
        };
		inCall.answer({
            localVideoDisplay: localDisplay,
            remoteVideoDisplay: remoteDisplay,
            receiveVideo: false,
            constraints: constraints
        });
		showAnswered();
    }).prop('disabled', false);
    ...
} |
6. Sending a confirmation to the SIP server
7. Receiving a confirmation from the SIP server
8. The first browser receives from the server an event confirming successful connection.
CallStatusEvent ESTABLISHED code
| Code Block | ||||
|---|---|---|---|---|
| ||||
    var outCall = session.createCall({
        ...
    }).on(CALL_STATUS.ESTABLISHED, function(){
		setStatus("#callStatus", CALL_STATUS.ESTABLISHED);
        $("#holdBtn").prop('disabled',false);
        onAnswerOutgoing();
        ...
    });

outCall.call(); |
9. The caller and the callee exchange audio and video streams
10. Terminating the call
call.hangup() code
| Code Block | ||||
|---|---|---|---|---|
| ||||
function onConnected(session) {
    $("#connectBtn, #connectTokenBtn").text("Disconnect").off('click').click(function(){
        $(this).prop('disabled', true);
		if (currentCall) {
			showOutgoing();
			disableOutgoing(true);
			setStatus("#callStatus", "");
			currentCall.hangup();
		}
        session.disconnect();
    }).prop('disabled', false);
} |
11. Sending the command to the SIP server
12. Receiving the command from the SIP server
13. Sending to the second browser an event confirming termination of the call
CallStatusEvent FINISH code
| Code Block | ||||
|---|---|---|---|---|
| ||||
    Flashphoner.createSession(connectionOptions).on(SESSION_STATUS.ESTABLISHED, function(session, connection){
        ...
    }).on(SESSION_STATUS.INCOMING_CALL, function(call){
        call.on(CALL_STATUS.RING, function(){
		    ...
        }).on(CALL_STATUS.FINISH, function(){
		    setStatus("#callStatus", CALL_STATUS.FINISH);
			onHangupIncoming();
		    currentCall = null;
            ...
}); |
14. Sending a confirmation to the SIP server
15. Receiving a confirmation from the SIP server
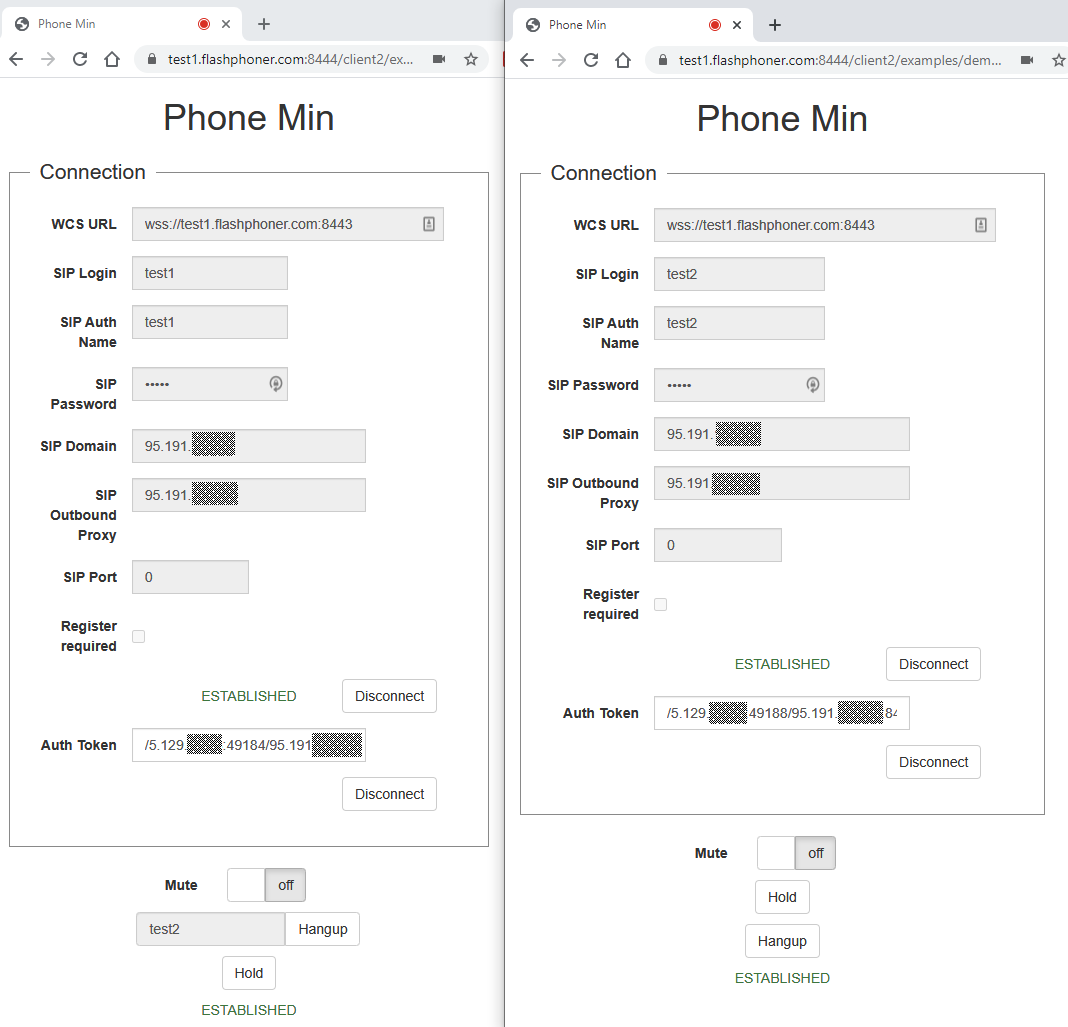
SIP calls without an external SIP server
WCS may establish a SIP call and process its traffic withoun an external SIP server (see the scheme above). To do this, the following parameters must be set in flashphoner.properties file
| Code Block | ||
|---|---|---|
| ||
enable_local_videochat=true
sip_add_contact_id=false |
1. For test we use:
- Phone web application to make a call
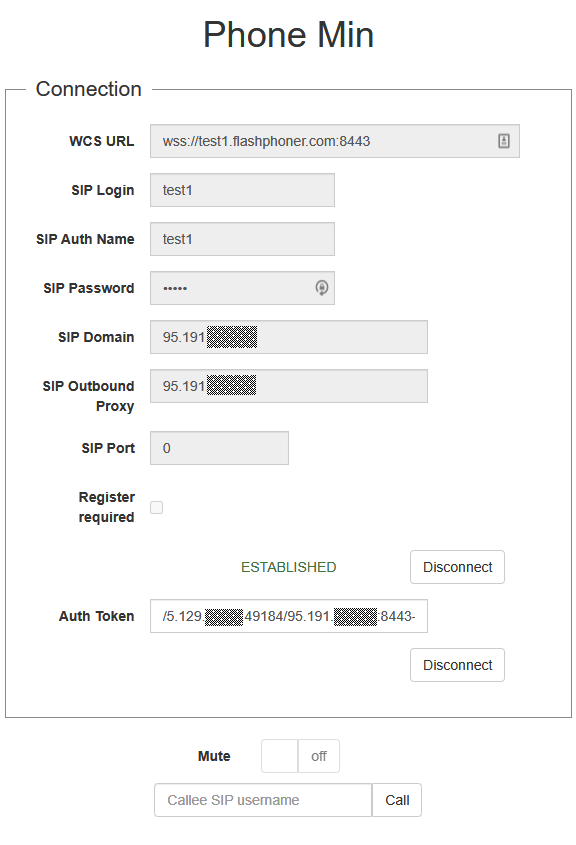
2. Open Phone web application page. Enter the following:
- user name
- password
- SIP Domain: set WCS server IP address (not domain name!)
- SIP Outbound Proxy: set WCS server IP address (not domain name!)
- set SIP Port to 0
- clean Register requred checkbox
Click Connect
3. Open Phone web application page in another browser window. Enter the following:
- second user name
- password
- SIP Domain: set WCS server IP address (not domain name!)
- SIP Outbound Proxy: set WCS server IP address (not domain name!)
- set SIP Port to 0
- clean Register requred checkbox
Click Connect
4. Enter callee name and click Call
5. Accept the call by clicking Answer
6. The call is established