Installation archives of WCS are available for download at this link.
You can download the installation archive directly to the server using wget, for example
wget https://flashphoner.com/downloads/builds/WCS/5.2/FlashphonerWebCallServer-5.2.XXXX.tar.gz
Installation
To install WCS you need to unpack the archive and execute the installation script install.sh:
tar -xvzf FlashphonerWebCallServer-5.2.XXXX.tar.gz
cd FlashphonerWebCallServer-5.2.XXXX
sudo ./install.sh
The installer will perform necessary checks and installs WCS to the following directory /usr/local/FlashphonerWebCallServer
Installation includes the following steps:
- Reading and accepting of the license agreement
- Specifying IP addresses in case the script was unable to discover them automatically (see IP address configuration)
- A request to add WCS to the Linux server autostart
- Java version checking and obsolete settings removing from wcs-core.properties file
As a result, a successful installation message will be shown. The following folders will be created in the /usr/local/FlashphonerWebCallServer directory:
- bin - WCS executables
- client - WCS JavaScript API 1.0, usage examples and stress-tests
- client2 - WCS JavaScript API 2.0 and usage examples
- conf - configuration files
- lib - required libraries
- tools - tools to debug WCS
- web - WCS web interface static pages
Silent mode installation
Sometimes, WCS can be installed in silent mode if automatic deployment system like Ansible is used to deploy a number of typical instances
./install.sh -silent
In this case:
- IP addresses detection does not work (flashphoner.properties file and other settings are supposed to be overwritten by automatic deployment system)
- webcallserver.service is configured to start from root
Installation to a different Java versions
JDK 12 or 14
The following settings should be removed from wcs-core.properties file
-XX:+UseConcMarkSweepGC
-XX:+PrintGCDateStamps
-XX:+PrintGCDetails
The following setting
-Xloggc:/usr/local/FlashphonerWebCallServer/logs/gc-core-
should be replaced by
-Xlog:gc*:/usr/local/FlashphonerWebCallServer/logs/gc-core-:time
JDK 15
In addition to setting changing for JDK 12 or 14, the following settings should be removed from wcs-core.properties file
-XX:+UseCMSInitiatingOccupancyOnly
-XX:CMSInitiatingOccupancyFraction=70
Acquiring a license and activation
You can purchase a commercial license online here: http://flashphoner.com/prices. Also, a free 30-days trial version is available at this page: http://flashphoner.com/get_trial/?product=wcs5
Activation using web interface
On first logon to WCS web interface by address https://yourserver:8444/admin/, where yourserver is your server hostname with by default user admin (password admin), the request for license number is displayed:

Enter your license number and press Next

If activation was successfull, log in page will be displayed.
Activation using command line
Use this script to activate the license:
cd /usr/local/FlashphonerWebCallServer/bin
sudo ./activation.sh
The script asks you to enter the license number:
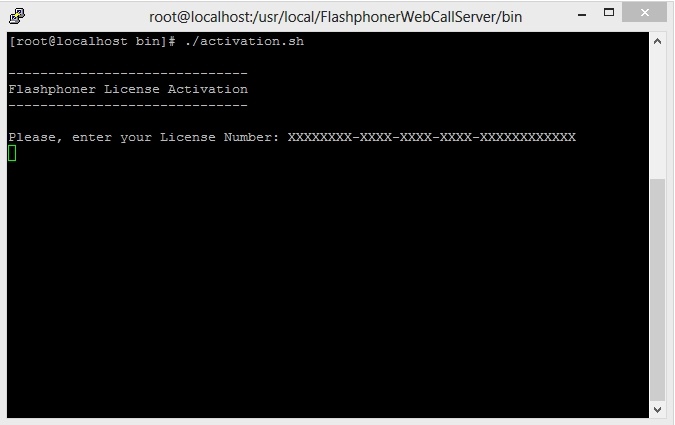
Enter the license number to finish the activation.
Deactivating a license
To activate the same license on another server, for example, if you transfer WCS to another server, deactivate the license on the old server and activate it again on the new server.
Deactivation using web interface
Log in to WCS web interface by address https://yourserver:8444/admin/, where yourserver is your server hostname. Press "License" button. The license key page will be displayed:
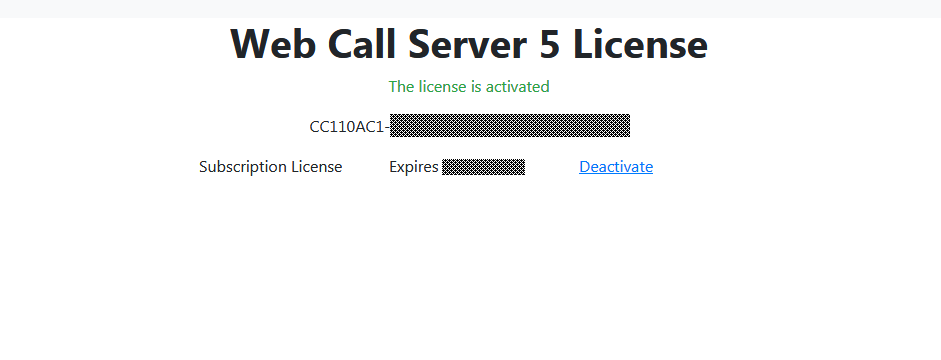
Click to Deactivate link. The license will be deactivated, and license key request page will be displayed:
Deactivation using command line
Use this script for deactivation:
sudo ./deactivation.sh
If activation fails
Check your firewall and make sure the WCS-сервер is able to establish an HTTPS / TCP connection to the activation server my.flashphoner.com:443
If the activation server is unavailable, configure HTTP proxy as described below.
Configuring HTTP proxy if the activation server is not available
Flashphoner license servers are behind AWS ELB (Elastic Load Balancer) at my.flashphoner.com. In case the ELB (and, correspondingly, the license servers) become unavailable for some reason, you will need to configure HTTP Proxy to make subscriptions work and to activate licenses.
Proxy settings can be found in the configuration file named /usr/local/FlashphonerWebCallServer/conf/wcs-core.properties:
# Proxy configuration
-Dhttp.proxyHost=proxy1.flashphoner.com
-Dhttp.proxyPort=3128
-Dhttps.proxyHost=proxy1.flashphoner.com
-Dhttps.proxyPort=3128
-Dhttp.nonProxyHosts=localhost|127.0.0.1|10.*|169.254.169.254
You can specify the address of your proxy server or the address of one of two Flashphoner proxy servers:
proxy1.flashphoner.com
proxy2.flashphoner.com
Important! Proxy settings do not allow quote symbols! The following example will NOT work:
-Dhttp.proxyHost="proxy2.flashphoner.com"
-Dhttp.proxyPort="3128"
-Dhttps.proxyHost="proxy2.flashphoner.com"
-Dhttps.proxyPort="3128"
-Dhttp.nonProxyHosts="localhost|127.0.0.1|10.*|169.254.169.254"
Configuring Firewall and NAT
For correct operation of the server, all ports listed in the table in the Server core section must be open for incoming traffic (UDP) or for establishing connection (TCP).
The table below lists example NAT rules for routing of incoming traffic in case the traffic comes to the external IP address and has to be routed to the server where WCS is installed. The table shows the minimum required number of ports necessary for operation of the server. Depending on the specific functions and modules (see the Architecture section), the set of rules may be extended in accordance with the table in the Server core section. The same ports must be opened in the firewall of the Linux server.
The table lists default ports. You can configure the WCS server to other other ports (see the Settings section).
Type | Protocol | Port Range | Source |
|---|---|---|---|
Custom UDP Rule | UDP | 30000-33000 | 0.0.0.0/0 |
| Custom TCP rule | TCP | 8081 | 0.0.0.0/0 |
Custom TCP Rule | TCP | 8444 | 0.0.0.0/0 |
Custom TCP Rule | TCP | 8443 | 0.0.0.0/0 |
Custom TCP Rule | TCP | 30000-33000 | 0.0.0.0/0 |
Custom TCP Rule | TCP | 1935 | 0.0.0.0/0 |
SSH | TCP | 22 | 0.0.0.0/0 |
SSH access via the standard port 22 is specified here only to administer the Linux server itself. Hence, the minimum required set of ports is:
- 1935 - RTMP
- 8081 - built-in WCS web server that works via HTTP
- 8443 - Secure Websocket
- 8444 - built-in WCS web server that works via HTTPS
- [30000-33000] - SIP, Media, RTSP
Description of SSL certificate configuration for Secure Websockets and HTTPS can be found in this section: SSL-certificates management.
IP address configuration
Proper installation requires discovering of the external IP address of your server and the address of the network interface. The installation script attempts to detect the address automatically, and if this has failed for some reasons, the script asks you to enter addresses manually.
If you followed recommendation of the 'Requirements and preparations for installing' section and began with a server with a static and public IP address that matches the one of the network interface, the IP address of your server can be discovered with a simple command
#ifconfig
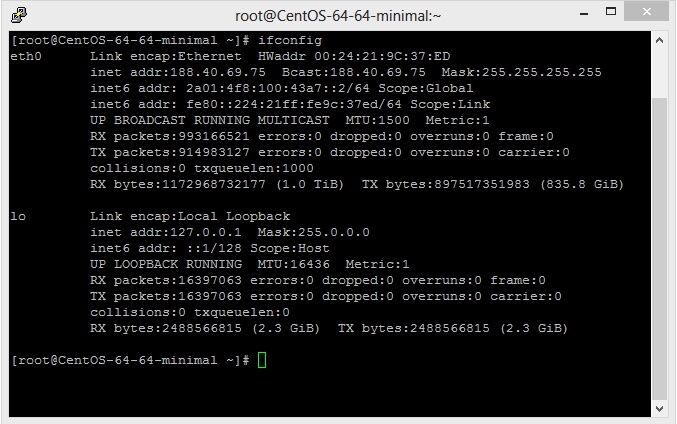
In this example, the IP address of the server is 188.40.69.75. Write the address down or copy it. You will need it later on installing.
Discovering IP addresses in case of NAT
Often the WCS5 server has to be placed behind a corporate NAT or on the rented server in a data center that does not provide dedicated static IP addresses. A good example of this case is Amazon EC2, where servers are behind NAT.
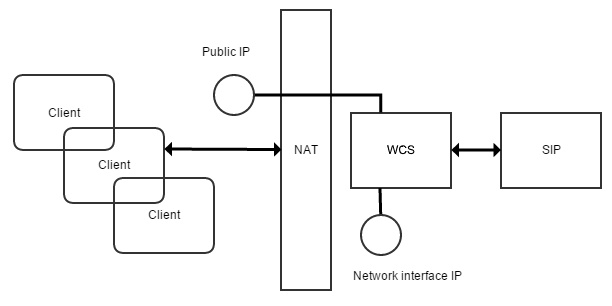
When the WCS server is to deployed behind NAT, you need to discover two IP addresses.
- The external IP address or Public IP not necessarily belongs to the WCS server, but traffic that goes to this external IP address should be obligatory redirected to WCS5.
- Network interface IP address or Private IP - this is a real address assigned to the network interface. Here WCS will open sockets to interact with the network.
For example, a test server on Amazon EC2 has the external IP address of: 54.189.212.111, and the network interface address is: 172.30.21.25. If your server is behind NAT in regard to browser clients, write down or copy these IP addresses. You will need them later, when you will configure the server.