Overview
Supported platforms and browsers
Chrome | Firefox | Safari 11 | Edge | |
|---|---|---|---|---|
Windows | + | + | + | |
Mac OS | + | + | + | |
Android | + | + | ||
iOS | - | - | + |
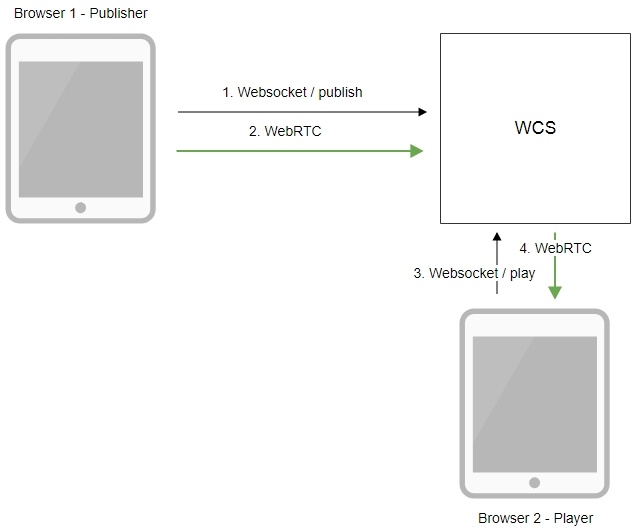
Operation flowchart
1. The browser connects to the server via the Websocket protocol and sends the publish command.
2. The browser captures the microphone and the camera and sends a WebRTC stream to the server.
3. The second browser establishes a connection also via Websocket and sends the play command.
4.The second browser receives the WebRTC stream and plays that stream on the page.
Quick manual on testing
Capturing a video stream from the web camera and preparing for publishing
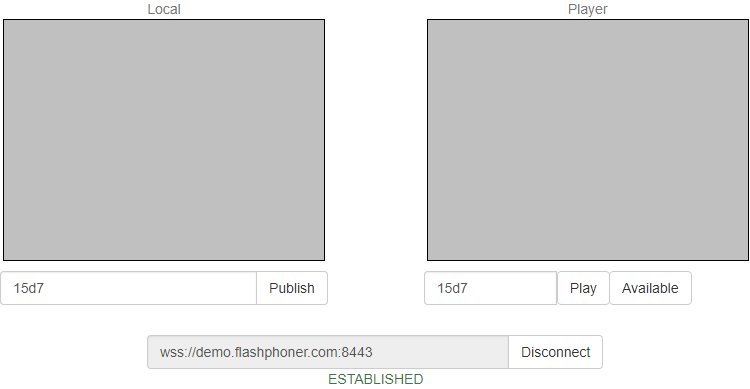
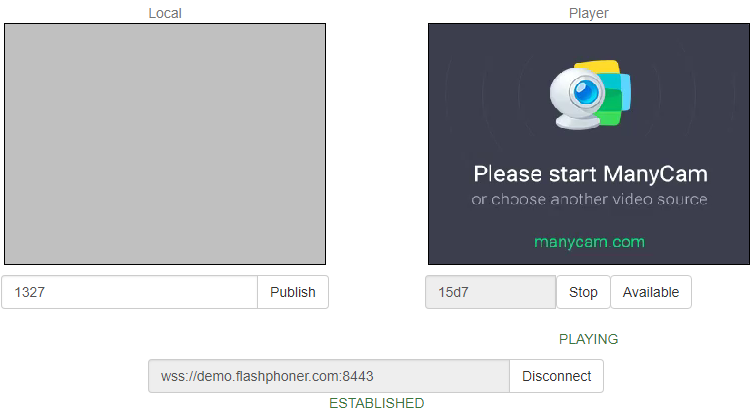
1. For this test we use the demo server at demo.flashphoner.com and the Two Way Streaming web application:
2. Establish a connection with the server by clicking the Connect button
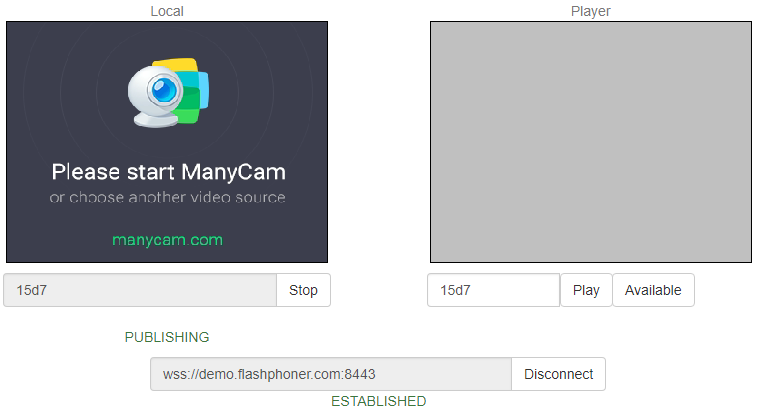
3. Click Publish. The browser captures the camera and sends the stream to the server.
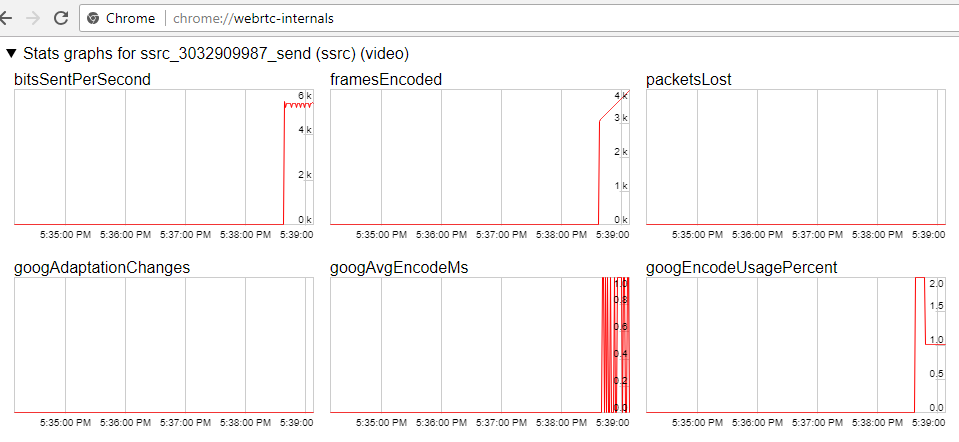
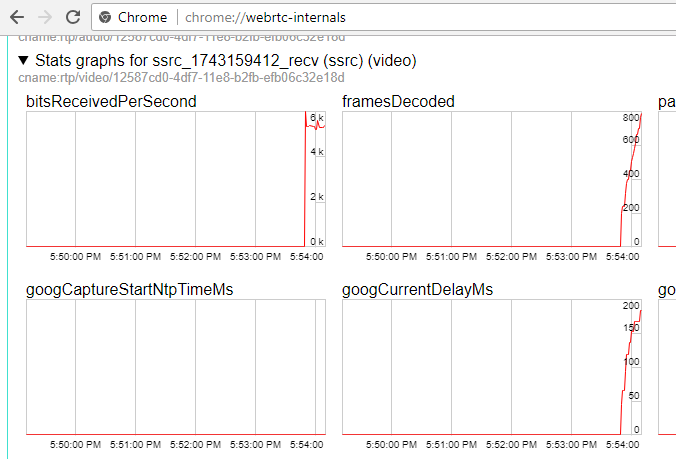
4. Make sure the stream us sent to the server and the system operates normally by opening chrome://webrtc-internals
5. Open the Two Way Streaming app in a new window, click Connect and specify the stream ID, then click Play.
6. Playback diagrams in chrome://webrtc-internals
Call flow
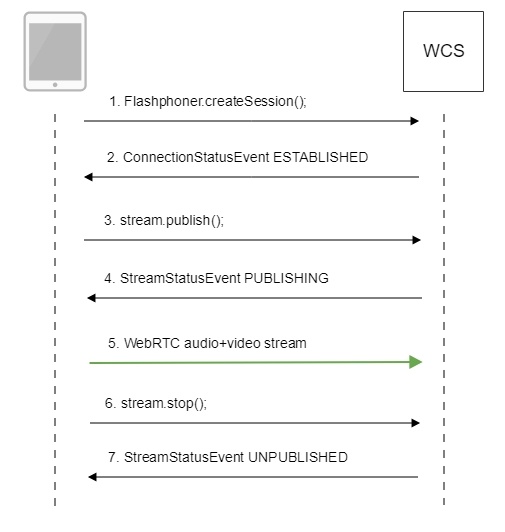
Below is the call flow based on the Two Way Streaming example
1. Establishing connection to the server.
Flashphoner.createSession(); code
 Flashphoner.createSession({urlServer: url}).on(SESSION_STATUS.ESTABLISHED, function (session) {
        setStatus("#connectStatus", session.status());
        onConnected(session);
    }).on(SESSION_STATUS.DISCONNECTED, function () {
        setStatus("#connectStatus", SESSION_STATUS.DISCONNECTED);
        onDisconnected();
    }).on(SESSION_STATUS.FAILED, function () {
        setStatus("#connectStatus", SESSION_STATUS.FAILED);
        onDisconnected();
    });
2. Receiving from the server the successful connection status.
ConnectionStatusEvent ESTABLISHED code
 Flashphoner.createSession({urlServer: url}).on(SESSION_STATUS.ESTABLISHED, function (session) {
        setStatus("#connectStatus", session.status());
        onConnected(session);
    }).on(SESSION_STATUS.DISCONNECTED, function () {
        setStatus("#connectStatus", SESSION_STATUS.DISCONNECTED);
        onDisconnected();
    }).on(SESSION_STATUS.FAILED, function () {
        setStatus("#connectStatus", SESSION_STATUS.FAILED);
        onDisconnected();
    });
3. Publishing the stream.
stream.publish(); code
    session.createStream({
        name: streamName,
        display: localVideo,
        cacheLocalResources: true,
        receiveVideo: false,
        receiveAudio: false
    }).on(STREAM_STATUS.PUBLISHING, function (stream) {
        setStatus("#publishStatus", STREAM_STATUS.PUBLISHING);
        onPublishing(stream);
    }).on(STREAM_STATUS.UNPUBLISHED, function () {
        setStatus("#publishStatus", STREAM_STATUS.UNPUBLISHED);
        onUnpublished();
    }).on(STREAM_STATUS.FAILED, function () {
        setStatus("#publishStatus", STREAM_STATUS.FAILED);
        onUnpublished();
    }).publish();
4. Receiving from the server the successful publishing status.
StreamStatusEvent, статус PUBLISHING code
    session.createStream({
        name: streamName,
        display: localVideo,
        cacheLocalResources: true,
        receiveVideo: false,
        receiveAudio: false
    }).on(STREAM_STATUS.PUBLISHING, function (stream) {
        setStatus("#publishStatus", STREAM_STATUS.PUBLISHING);
        onPublishing(stream);
    ...
    }).publish();
5. Sending audio-video stream via WebRTC
6. Stopping publishing the stream.
stream.stop(); code
function onPublishing(stream) {
    $("#publishBtn").text("Stop").off('click').click(function () {
        $(this).prop('disabled', true);
        stream.stop();
    }).prop('disabled', false);
    $("#publishInfo").text("");
}
7. Receiving from the server an even confirming successful unpublishing.
StreamStatusEvent, статус UNPUBLISHED code
    session.createStream({
        name: streamName,
        display: localVideo,
        cacheLocalResources: true,
        receiveVideo: false,
        receiveAudio: false
    ...
    }).on(STREAM_STATUS.UNPUBLISHED, function () {
        setStatus("#publishStatus", STREAM_STATUS.UNPUBLISHED);
        onUnpublished();
    ...
    }).publish();
Stream publishing with local video playback in Delight Player
When stream is captured from webcamera it is possible to play a local video in a browser-based VR player, Delight Player for example. This way stream can be played in virtual and mixed reality devices if one of browsers supporteds work on this device. To integrate a custom player JavaScript and HTML5 features are used.
Testing
1. For test we use:
- WCS server
- test page with Delight VR player to play stream while publishing
2. Set stream name test and press Publish. Stream published is played in Delight player
Player page example code
1. Declaration of video element to play the stream, stream name input field and Publish/Unpublish buttons
        <div style="width: 50%;">
            <dl8-live-video id="remoteVideo" format="STEREO_TERPON" muted="true">
                <source>
            </dl8-live-video>
        </div>
		<input class="form-control" type="text" id="streamName" placeholder="Stream Name">
		<button id="publishBtn" type="button" class="btn btn-default" disabled>Publish</button>
		<button id="unpublishBtn" type="button" class="btn btn-default" disabled>UnPublish</button>
2. Player readiness event handling
            document.addEventListener('x-dl8-evt-ready', function () {
				dl8video = $('#remoteVideo').get(0);
				$('#publishBtn').prop('disabled', false).click(function() {
					publishStream();
				});
            });
3. Creating mock elements to play a stream
			var mockLocalDisplay = $('<div></div>');
			var mockLocalVideo = $('<video></video>',{id:'mock-LOCAL_CACHED_VIDEO'});
			mockLocalDisplay.append(mockLocalVideo);
4. Establishing connection to the server and stream creation
			var video = dl8video.contentElement;
			Flashphoner.createSession({urlServer: url}).on(SESSION_STATUS.ESTABLISHED, function (session) {
			var session = Flashphoner.getSessions()[0];
			session.createStream({
				name: $('#streamName').val(),
				display: mockLocalDisplay.get(0)
			}).on(STREAM_STATUS.PUBLISHING, function (stream) {
                ...
			}).publish();
			})
5. Publishing stream, playback start in VR player and Unpublish button handling
			...
			}).on(STREAM_STATUS.PUBLISHING, function (stream) {
				var srcObject = mockLocalVideo.get(0).srcObject;
				video.srcObject = srcObject;
				dl8video.start();
				mockLocalVideo.get(0).pause();
				mockLocalVideo.get(0).srcObject = null;
				$('#unpublishBtn').prop('disabled', false).click(function() {
					stream.stop();
					$('#publishBtn').prop('disabled', false);
					$('#unpublishBtn').prop('disabled', true);
					dl8video.exit();
				});
			}).publish();
Full source code of the sample VR player page
If Chrome browser sends empty video due to web camera conflict
Some Chrome versions does not return an error if web camera is busy, but publish a stream with empty video (black screen). In this case, stream publishing can be stopped by two ways: using JavaScript and HTML5 on client, or using server settings.
Stopping a stream with empty video on client side
Videotrack that Chrome browsers creates for busy web camera, stops after no more than one second publishing, then stream is send without a videotrack. In this case videotrack state (readyState variable) changes to ended, and corresponding onended event is generated that can be catched by web application. To use this event:
1. Add to web application script the registartion function for onended event handler, in which stream pub;ishing is stopped with stream.stop()
function addVideoTrackEndedListener(localVideo, stream) {
    var videoTrack = extractVideoTrack(localVideo);
    if (videoTrack && videoTrack.readyState == 'ended') {
        console.error("Video source error. Disconnect...");
        stream.stop();
    } else if (videoTrack) {
        videoTrack.onended = function (event) {
            console.error("Video source error. Disconnect...");
            stream.stop();
        };
    }
}
2. Add function to remove event handler when stream is stopped
function removeVideoTrackEndedListener(localVideo) {
    var videoTrack = extractVideoTrack(localVideo);
    if(videoTrack) {
        videoTrack.onended = null;
    }
}
3. Add function to extract videotrack
function extractVideoTrack(localVideo) {
    return localVideo.firstChild.srcObject.getVideoTracks()[0];
}
4. Register event handler when publishing a stream
    session.createStream({
        name: streamName,
        display: localVideo,
        ...
    }).on(STREAM_STATUS.PUBLISHING, function (stream) {
        addVideoTrackEndedListener(localVideo, stream);
        setStatus("#publishStatus", STREAM_STATUS.PUBLISHING);
        onPublishing(stream);
        ...
    }).publish();
5. Remove event handler when stopping a stream
function onPublishing(stream) {
    $("#publishBtn").text("Stop").off('click').click(function () {
        $(this).prop('disabled', true);
        removeVideoTrackEndedListener(localVideo);
        stream.stop();
    }).prop('disabled', false);
    $("#publishInfo").text("");
}
Videotrack activity checking on server side
Videotrack activity checking for streams published on server is enabled with the following parameters in flashphoner.properties file
rtp_activity_detecting=true,60
rtp_activity_video=true
In this case, if there is no video in stream, its publishing will be stopped after 60 seconds.
Video only stream publishing with constraints
In some cases, video only stream should be published while microphone is busy, for example video is published while voice phone call. To prevent browser access request to microphone, set the constraints for video on;ly publishing:
    session.createStream({
        name: streamName,
        display: localVideo,
        constraints: {video: true, audio: false}
        ...
    }).publish();
Audio only stream publishing
In most cases, it is enough to set the constraints to publish audio only stream:
    session.createStream({
        name: streamName,
        display: localVideo,
        constraints: {video: false, audio: true}
        ...
    }).publish();
Audio only stream publishing in Safari browser
When audio only stream is published from iOS Safari browser with constraints, browser does not send audio packets. To workaround this, a stream should be published with video, then video should be muted:
    session.createStream({
        name: streamName,
        display: localVideo,
        constraints: {video: true, audio: true}
        ...
    }).on(STREAM_STATUS.PUBLISHING, function (stream) {
        stream.muteVideo();
        ...
    }).publish();
In this case, iOS Safari browser will send emply video packets (blank screen) and audio packets.
Disable resolution constraints normalization in Safari browser
By default, WebSDK normalizes stream publishing resolution constraints set in Safari browser. In this case, if width or height is not set, or equal to 0, then the picture resolution is forced to 320x240 or 640x480. Since WebSDK build 0.5.28.2753.109 (hash 149855cc050bf7512817104fd0104e9cce760ac4), it is possible to disable normalization and pass resolution constarints to the browser as is. for example:
publishStream = session.createStream({
    ...
    disableConstraintsNormalization: true,
    constraints {
        video: {
            width: {ideal: 1024},
            height: {ideal: 768}
        },
        audio: true
    }
}).on(STREAM_STATUS.PUBLISHING, function (publishStream) {
    ...
});
publishStream.publish();
Known issues
1. If the web app is inside an iframe element, publishing of the video stream may fail.
Symptoms: IceServer errors in the browser console.
Solution: put the app out of iframe to an individual page.
2. If publishing of the stream goes under Windows 10 or Windows 8 and hardware acceleration is enabled in the Google Chrome browser, bitrate problems are possible.
Symptoms: low quality of the video, muddy picture, bitrate shown in chrome://webrtc-internals is less than 100 kbps.
Solution: turn off hardware acceleration in the browser, switch the browser of the server to use the VP8 codec.
3. Stream publishing with local video playback in Delight Player does not work in MS Edge
Symptoms: when stream is published in MS Edge, local video playback does not start in Delight Player
Solution: use another browser to publish a stream
4. In some cases microphone does not work in Chrome browser while publishing WebRTC stream.
Symptoms: michrophone does not work while publishing WebRTC stream, including example web applications out of the box
Solution: turn off gain node creation in Chrome browser using WebSDK initialization parameter createMicGainNode: false
        Flashphoner.init({
            flashMediaProviderSwfLocation: '../../../../media-provider.swf',
            createMicGainNode: false
        });
Note that microphone gain setting will not work in this case.
5. G722 codec does not work in Edge browser
Symptoms: WebRTC stream with G722 audio does not publish in Edge browser
Solution: use another codec or another browser. If Edge browser must be used, exclude G722 with the following parameter
codecs_exclude_streaming=g722,telephone-event
6. Some Chromium based browsers, for example Opera, Yandex, do not support H264 codec depending on browser and OS version
Symptoms: stream publishing does not work, stream playback works partly (audio only) or does not work at all
Solution: enable VP8 on server side
codecs=opus,...,h264,vp8,...
exclude H264 for publishing or playing on client side
publishStream = session.createStream({
    ...
    stripCodecs: "h264,H264"
}).on(STREAM_STATUS.PUBLISHING, function (publishStream) {
    ...
});
publishStream.publish();
Note that stream transcoding on server is enabled when stream published as H264 is played as VP8 and vice versa.
7. iOS Safari 12.1 does not send video frames when picture with certain resolution is published
Symptoms: when H264 stream is published from iOS Safari 12.1, subscriber receives audio packets only, publishers WebRTC statistics also shows audio frames only
Solution: enable VP8 on server side
codecs=opus,...,h264,vp8,...
exclude H264 for publishing or playing on clent side
publishStream = session.createStream({
    ...
    stripCodecs: "h264,H264"
}).on(STREAM_STATUS.PUBLISHING, function (publishStream) {
    ...
});
publishStream.publish();
Note that stream transcoding on server is enabled when stream published as H264 is played as VP8 and vice versa.
8. Stream from built-in camera cannot be published in iOS Safari 12 and MacOS Safari 12 in some resolutions
Symptoms: stream publishing from browser fails with error in console
Overconstrained error: width
Solution:
a) use only resolutions which passes WebRTC Camera Resolution test
b) use external camera supporting resolutions as needed in MacOS Safari
c) disable resolution constraints normalization and set width and height as ideal, see example above.
9. Non-latin characters in stream name should be encoded
Symptoms: non-latin characters in stream name are replaced to questionmarks on server side
Solution: use JavaScript function encodeURIComponent() while publishing stream
    var streamName = encodeURIComponent($('#publishStream').val());
    session.createStream({
        name: streamName,
        display: localVideo,
        cacheLocalResources: true,
        receiveVideo: false,
        receiveAudio: false
    ...
    }).publish();
10. In some cases, server can not parse H264 stream encoded with CABAC
Symptoms: WebRTC H264 stream publishing does not work
Solution:
a) use lower encoding profile
b) enable VP8 on server side
codecs=opus,...,h264,vp8,...
exclude H264 for publishing or playing on clent side
publishStream = session.createStream({
    ...
    stripCodecs: "h264,H264"
}).on(STREAM_STATUS.PUBLISHING, function (publishStream) {
    ...
});
publishStream.publish();
Note that stream transcoding on server is enabled when stream published as H264 is played as VP8 and vice versa.
11. When playing WebRTC broadcast in Firefox on macOS Catalina, displayed system warning and block on playing H264 stream.
Symptoms: when playing WebRTC broadcast in Firefox on macOS Catalina, displayed system warning "libgmpopenh264.dylib" can`t be opened because it is from an identified developer" and block of playing H264 stream.
Solution: Firefox uses a third-party library unsigned by the developer to work with H264. In accordance with macOS Catalina security policies, this is prohibited. To add an exception, go to System Preferences > Security & Privacy > General > Allow apps downloaded from > App Store and identified developers> "libgmpopenh264.dylib" was blocked from opening because it is not from an identified developer" > tap Open Anyway.
